
Unboxing a new AIO-6 feels good, but the real difference starts when you set it up right. Riders who rush the first install often spend the next few weeks troubleshooting features that never worked properly in the first place. Taking the time on day one saves you from those headaches later.
Setup means more than just bolting it on. The screen needs to be placed where it stays visible in sunlight, the power wired so the unit runs reliably, and the rear camera aligned so BSD can read traffic accurately. It also means formatting the microSD card, running a quick test recording, dialing in sensitivity so alerts happen when you need them, and adding extras like TPMS sensors or the handlebar remote to make the system even more seamless. Done properly, these are one-time steps that give you a system you can depend on every ride.
![]()
A proper setup ensures your AIO-6 runs smoothly—clear screen, stable power, and accurate safety alerts every ride. Source
On the software side, installing the latest firmware ensures stability across BSD, dashcam recording, and CarPlay or Android Auto.
Once these steps are handled, the AIO-6 isn't just mounted, it's integrated into your bike, ready to perform from the first ride.
Mounting and Positioning
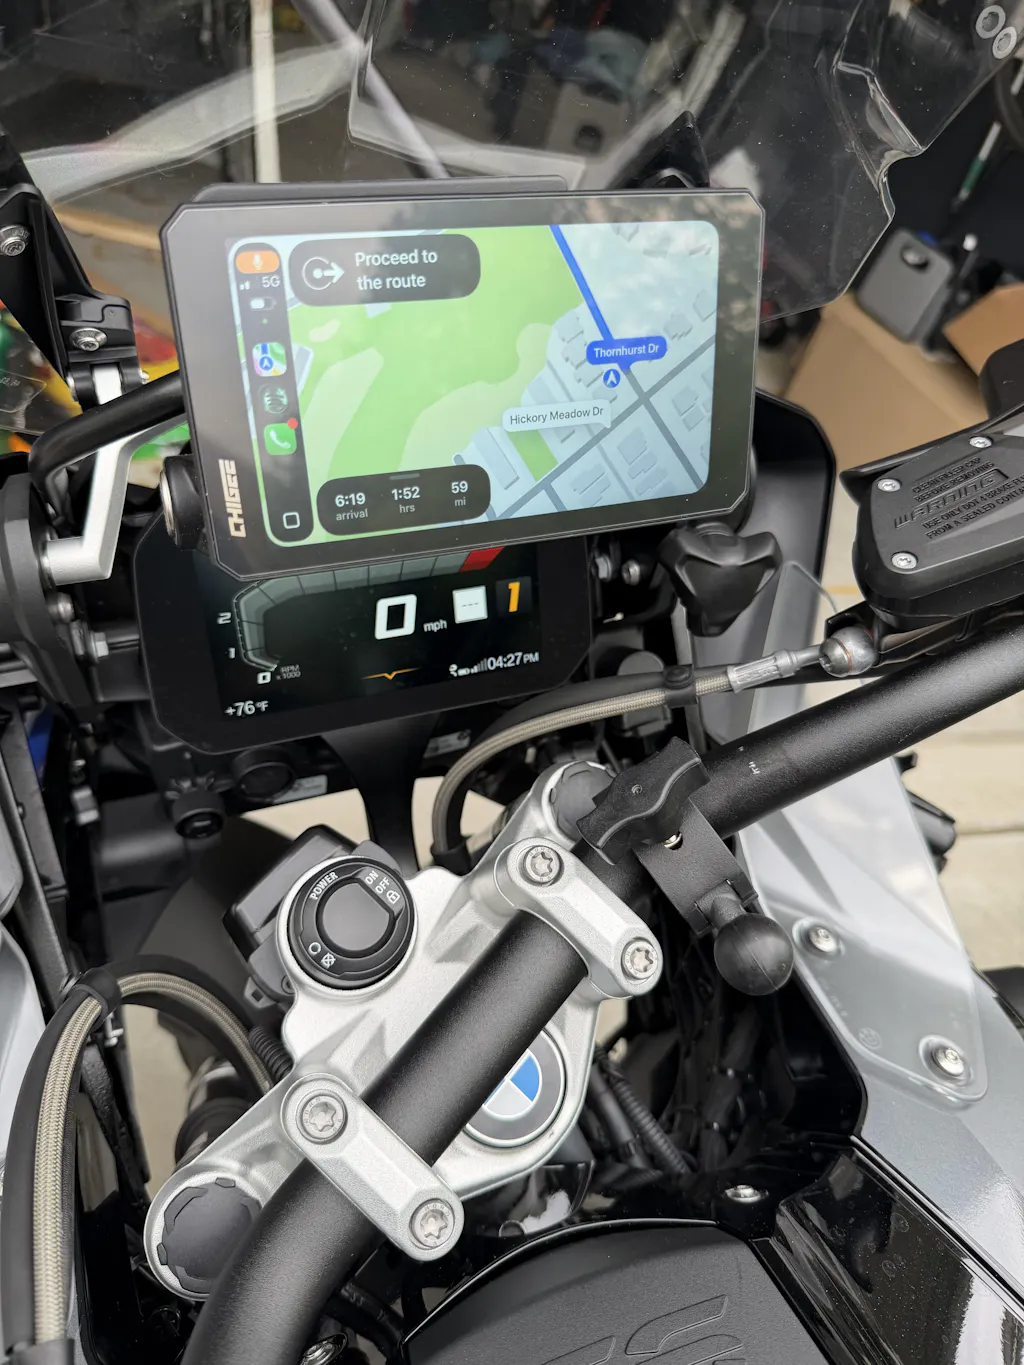
The first step is fixing the AIO-6 where you can see and reach it. Out of the box you get a standard handlebar mount. Open the clamp, position it on the bar, and tighten it until it is snug but not forced. Make sure it sits level and in line with your sight. Once the clamp is secure, place the AIO-6 onto the mount and tighten the grip over the top ball mount until it holds the device firmly. Give it a gentle push or pull to confirm it is locked in before riding.

Secure your AIO-6 with the handlebar mount—tight, level, and aligned for clear visibility and reliable use on every ride.
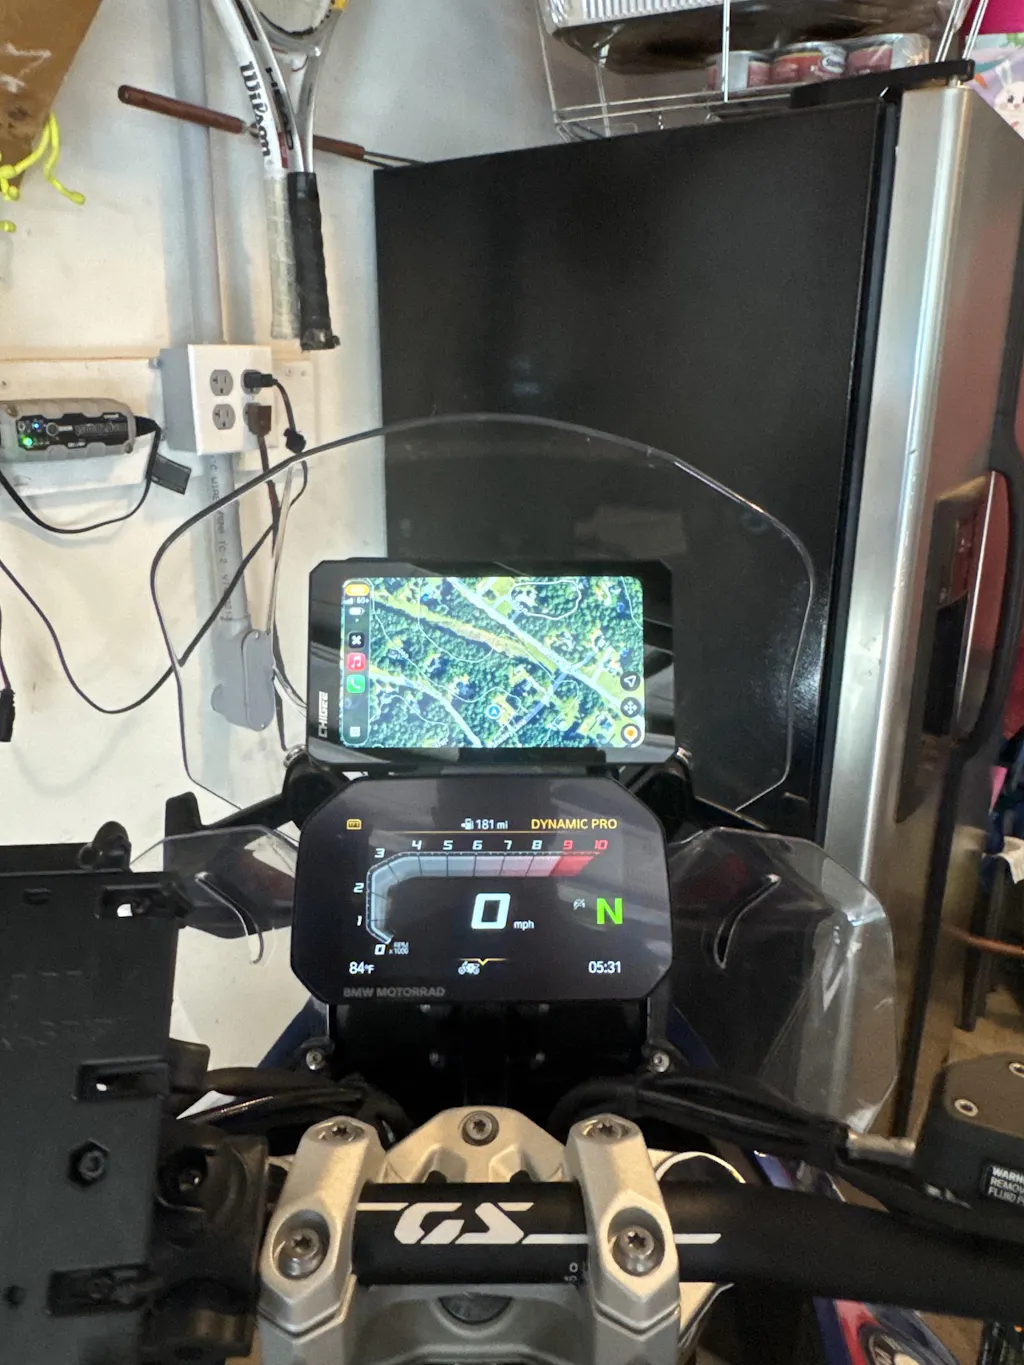
Take a moment to angle the screen while sitting in your normal riding position. It should be visible in full sunlight and easy to touch with a gloved hand. Small adjustments now prevent glare and awkward reach later.
If you want more flexibility, Chigee offers a range of optional mounts. The Quick Release Mount lets you remove the unit in seconds, which is useful if you park outside, bring the display indoors to charge, or swap between more than one bike. BMW riders can take advantage of the BMW-specific Quick Release Mount, which locks directly into the BMW Nav Prep 5/6 cradle –however, fitment depends on the bike, and it will not work on every BMW model. On the R1200RT (2014–2017) and R1250RT (2020), installation requires an extension bracket.

The Quick Release mount is ideal for riders with multiple bikes who want to swap the unit from bike to bike.
If your bike has a center crossbar, you might prefer the Chigee Crossbar Mount. It bolts directly onto the bar and holds the AIO-6 closer to your natural line of sight. Adventure riders often choose this setup for added stability and better visibility when standing on the pegs.
For sport bikes with hollow stems, the Fork Stem Mount provides a central, low-profile fit when bar space is limited. Yamaha owners also get a dedicated option with the TMAX 560 Mount, which delivers a secure and factory-like installation for that scooter's cockpit. Each option is solid, but the right choice depends on your bike and how you ride.
Power Connection
Once the mount is secure, the next step is powering the AIO-6. USB is the quickest way to get started. Plug the cable into a powered port and the unit will boot with the key. This works fine for testing, but even then USB only supplies enough current for the display itself, it will not provide sufficient power to use the cameras. It is strongly advised not to use USB-C power during actual riding, as it requires opening the waterproof cover and water ingress could damage the device.
The supplied power cable has three leads: red, yellow, and black. The red wire connects to the positive battery terminal, the black goes to the negative, and the yellow is the ACC line. That yellow lead is what controls on/off with the ignition. With ACC wired, the AIO-6 powers up when you turn the key and shuts down when you switch it off. The result is stable power without draining the battery while parked.

Power smart: wire it once, ride worry-free—ignition-controlled stability without draining your battery.
On bikes with a fuse box, the yellow cable can be tapped into an ignition-switched fuse. Use a multimeter to find a circuit that shows voltage with the key on but not when it is off. On bikes without a fuse box, you can connect the yellow cable to the tail light harness instead. Remove the seat and panels around the tail section, open the tail light housing, and use a multimeter to identify which wire feeds the tail light when the ignition is on. That is the line you connect the yellow cable to.
Once everything is connected, route the harness neatly along the frame. Secure it with zip ties, leave enough slack for the bars to turn lock-to-lock, and keep the cables away from heat and moving parts. Avoid the three-pin connector under the seat—it is not rated for this load and can cause faults. A clean wiring job makes the difference between a system that runs reliably for years and one that cuts out at the worst time.

Neat wiring with zip ties keeps cables safe from heat and movement—key to a system that runs reliably for years.
Firmware Update
Before you hit the road, check that the AIO-6 is running the latest firmware. Out of the box it may not have the most recent build, and skipping this step is one of the main reasons riders run into glitches later. Updates are handled directly on the device.

Keep your AIO-6 bug-free and stable—update via Wi-Fi or 4G before hitting the road.
Connect the AIO-6 to Wi-Fi or, if you are running the LTE model with a SIM card installed, you may use the 4G connection. From the settings menu you can check for updates, download the latest package, and install it. Make sure the bike is powered during the process, ideally through the ACC hardwire connection, since updates can fail if the device is running on an unstable USB feed. Or just take the AIO-6 inside and plug it into a wall outlet while it’s updating.
If you are using 4G, keep in mind that weak signal can sometimes be a problem. In areas with spotty coverage the download may stall or fail. In that case it is safer to connect the AIO-6 to a stable Wi-Fi network before trying again.
Installing updates early does more than fix bugs. It improves stability for the cameras, blind spot detection, CarPlay and Android Auto, and features like TPMS and the remote control. The firmware is what keeps everything working together. Taking a few minutes to update now means you start with a system that is current and ready for the road.
Camera Setup
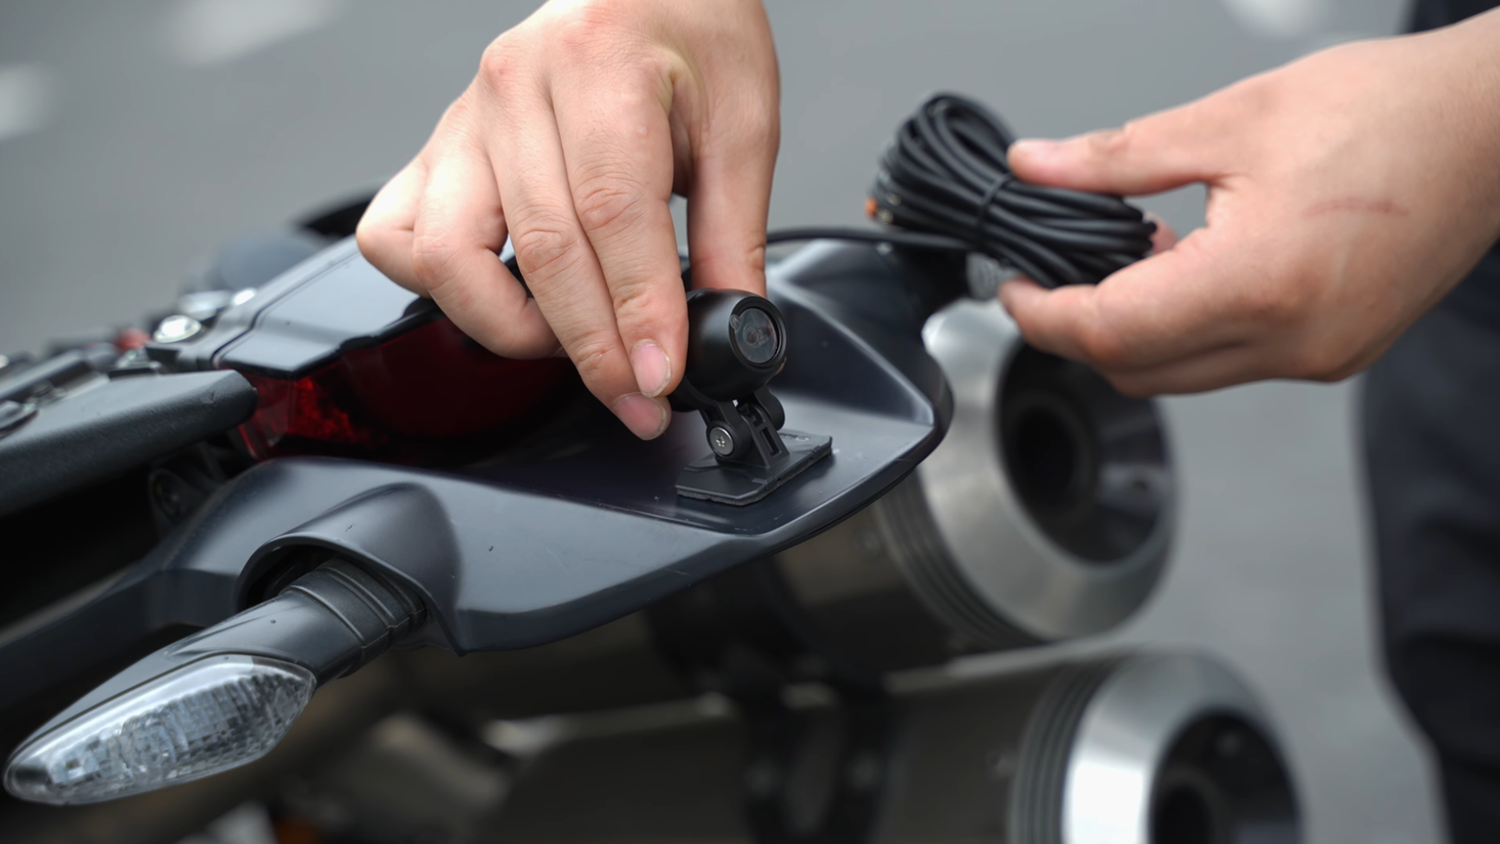
The AIO-6 uses its front and rear cameras for dashcam recording, while the rear camera also powers blind spot detection, so placement matters. Start with the front camera. Mount both as close to the centerline as possible, make sure they have an unobstructed wide field of view and they’re angled level to the road. Don’t worry about whether the mount itself is above or below the camera – you can reorient the camera later on the device.

Centered and level—proper camera placement ensures clear footage and accurate blind spot detection.
Once the mounts are fixed, route the cables along the frame, following the same logic you used for the power harness. Keep them away from hot engine parts, moving suspension, or sharp edges that can wear through insulation. Use zip ties or clips to secure them at regular intervals, and leave a little slack at the ends to absorb vibration and allow for steering movement. A neat install prevents disconnections and keeps video feeds stable.
You can store a few hours of footage on the device’s 32GB internal memory, but for more, insert a high-quality microSD card into the main unit and format it through the AIO-6 menu before recording. Formatting in-device ensures the file system is correct and avoids errors later. Then set your recording preferences. Higher resolution gives you more detail if you need footage after an incident. Loop recording means the oldest files are overwritten automatically once the card is full.
Before your first real ride, run a short test. Power the bike, ride around the block, then check the footage. Make sure both cameras are recording smoothly, angles are correct, and the blind spot system is reading inputs. A quick check now saves you from discovering a blocked view or dead camera after hours on the road.
A quick loop around the block ensures your cameras and blind spot system are working before hitting the open road. Source
BSD Calibration
Blind Spot Detection relies entirely on the rear camera, so its placement is critical. Mount it straight, level, and firmly fixed, with an unobstructed view behind the bike. If the lens points even slightly off-center, BSD may trigger late, miss traffic, or warn on objects that are not a threat. Make sure it is not blocked by luggage, a top case, or bodywork before moving on.
Once the camera is secure, run the calibration from the AIO-6 settings menu. Park the bike upright on level ground and keep the area behind it clear. The system will map your blind spot zones and prompt you if adjustments are needed.

Proper rear camera alignment and calibration ensures blind spot detection works reliably at speed without false alerts.
You can also fine-tune BSD behavior. Sensitivity controls how early the system warns you. Higher sensitivity is useful on highways, where vehicles approach quickly. Lower sensitivity is better in city riding, where constant stop-and-go traffic can otherwise flood you with alerts. You can also set a speed activation threshold, which tells BSD not to trigger below a certain speed. This keeps the system quiet in slow maneuvers and parking lots.
Calibration only takes a few minutes, but it makes all the difference. With the rear camera aligned and the settings dialed in for your riding, BSD becomes a quiet safety net—there when you need it, invisible when you do not.
Phone Pairing
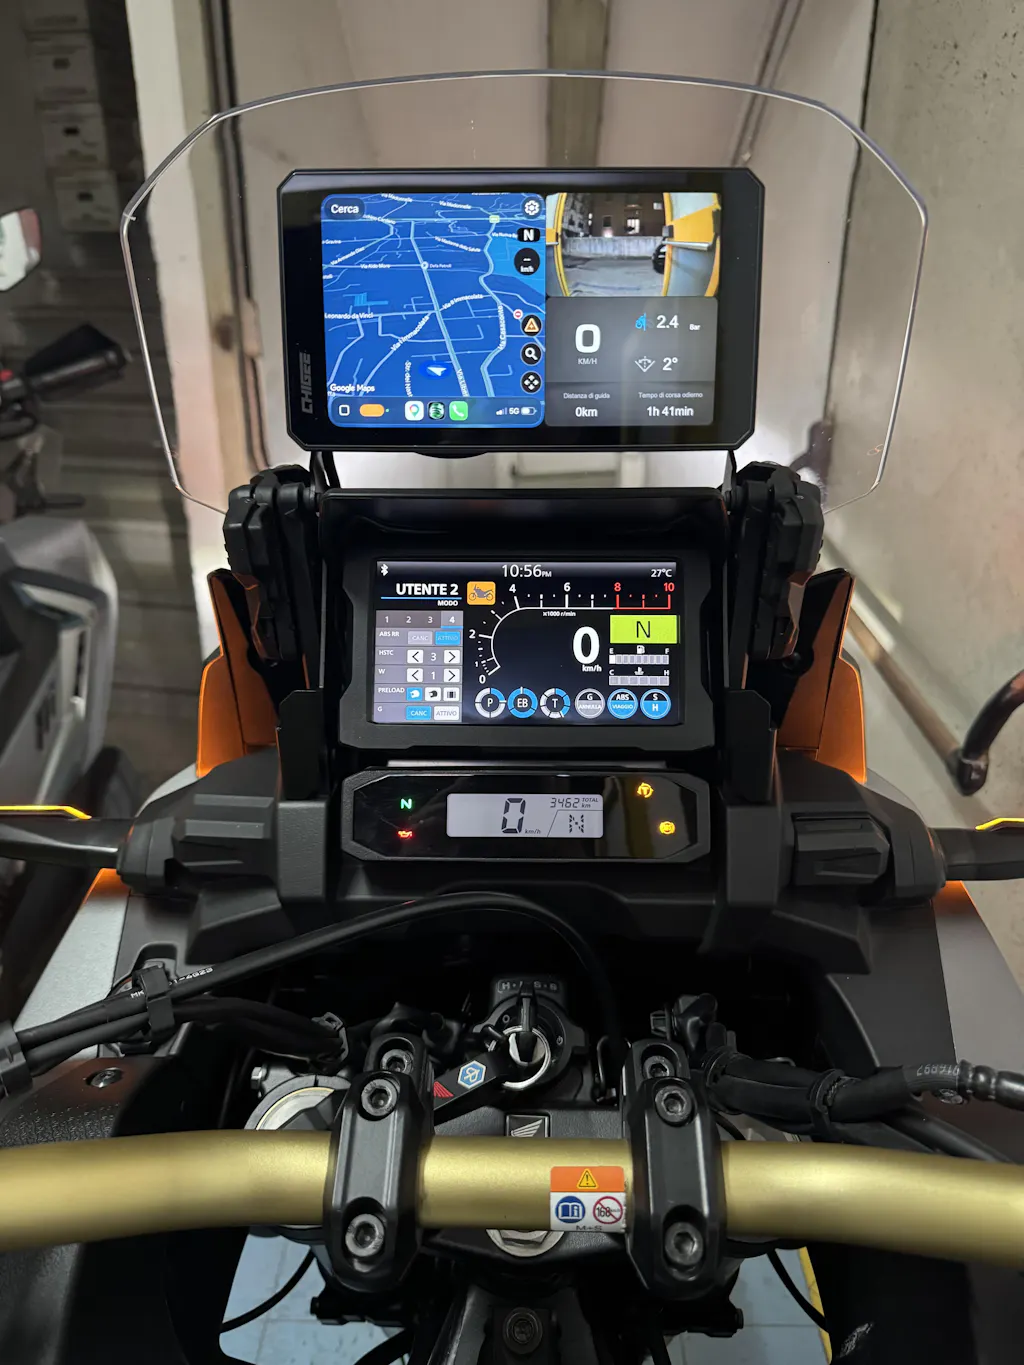
With power and cameras set, the next step is connecting your phone and headset. The AIO-6 supports Apple CarPlay and Android Auto, so your phone becomes the source for maps, music, and calls. Start by checking compatibility—most modern iPhones and Android devices are supported, but it is worth confirming your model against Chigee’s phone compatibility list.
To connect the AIO-6, go to its Bluetooth menu and link it with your phone. Then enable CarPlay or Android Auto and follow the prompts. Expect the first setup to take a minute or two, but once paired it reconnects automatically when you power on.

From pocket to dash: pair your phone and let the AIO-6 handle navigation, tunes, and calls seamlessly.
Riding with a Cardo or Sena? Pair your phone directly with your headset as you normally would. The AIO-6 does not connect to the headset itself. Instead, the phone handles audio, while the AIO-6 provides the visual interface and touchscreen control for CarPlay or Android Auto. This way, navigation prompts, calls, and music flow into your helmet automatically once the phone is linked to both the headset and the display.
If you notice dropouts, re-pair the phone to both devices and restart.
Tire Pressure Monitoring (TPMS)
If you are running Chigee’s external tire pressure sensors, now is the time to set them up. They install directly on the valve stems in place of your dust caps, one for the front and one for the rear. Screw them on firmly by hand, making sure the rubber seal inside each sensor is seated properly so no air escapes. Once installed, pair them through the AIO-6 settings menu. The display will detect each sensor, assign it to front or rear, and show live pressure and temperature.

No guessing, no flat surprises—just live numbers that keep your wheels rolling. Source
Baseline matters. Before pairing, inflate both tires to your manufacturer’s recommended cold pressures. The AIO-6 uses that as a reference when warning you of pressure drops. If you normally adjust pressure for off-road riding or heavy loads, set them to the values you actually plan to run, then pair the sensors.
On the road, the TPMS lets you keep track of live pressure and temperature, with alarms that you can set to warn of abnormal changes. It's recommended to set the high-pressure alarm about 20–25% above your normal tire pressure and the low-pressure alarm about 10% below it. For touring and commuting, that means early notice of leaks or overinflation. For adventure riders, it also helps you stay on top of pressures when you air down for gravel and need to air back up before returning to the road.
Remote Control and Wonder Wheel
Once the display is powered and cameras are running, setting up the remote control makes the AIO-6 easier to use on the move. The Chigee CGRC remote mounts to the handlebar within thumb reach. Clamp it in place, pair it through the AIO-6 settings, and confirm the buttons are mapped correctly. The remote lets you start and stop recording, switch views, and control basic functions without lifting your hand off the grip. It is a small addition that makes a big difference in traffic or on rough roads.
Stay in command on rough roads—the AIO-6 remote keeps controls within thumb’s reach when it matters most. Source
BMW riders can go a step further with the CGRC CAN for BMW: Wonder Wheel Control Module. This module connects the AIO-6 to the factory Wonder Wheel on GS, RT, and other compatible models. Once installed, you can scroll menus, zoom maps, and confirm selections directly from the stock wheel on the left grip. The integration feels seamless—no extra buttons, just your bike’s existing control feeding straight into the AIO-6.
You can also use the CGRC LIN for Wonder Wheel support and native vehicle data integration into the AIO-6, but you won’t be able to use the BMW Quick-Release Module since this module uses BMW Nav’s 3-pin port.
Unlock full Wonder Wheel control and live bike data with CGRC LIN, but skip the BMW Quick-Release Module for this setup.
Test whichever control option you use before heading out. Press the buttons with gloves on, make sure the functions respond quickly, and adjust placement if needed. With the remote or Wonder Wheel set up right, the AIO-6 becomes more than just a touchscreen, naturally controllable without taking your hands off the bars.
Key Use Cases
Setting up the AIO-6 on day one is only half the story. The real test is how those features play out once you are on the road. Whether you are commuting through traffic, loading the bike for a weeklong tour, or heading off pavement, the setup choices you made with mounts, wiring, cameras, and connectivity shape the way the AIO-6 works for you. Here is what that looks like in practice.

The true test of AIO-6 begins on the road—where your setup choices shape every ride, from traffic to touring. Source
Commuting Confidence
For daily riders, the AIO-6 takes stress out of traffic. Blind Spot Detection becomes a second set of eyes, alerting you when cars slide into places your mirrors do not cover. The cameras records every move in case you need evidence later, while live tire pressure readings warn you of a slow leak before it becomes a flat on the way to work.
Stay sharp in traffic—BSD, dashcam recording, and TPMS keep you covered where mirrors and instincts can't. Source
CarPlay or Android Auto makes quick navigation changes simple when traffic reroutes you, and with the handlebar remote or BMW’s Wonder Wheel you can switch tracks, mute audio, or confirm a call without fumbling with the touchscreen. It is a setup that reduces distraction and keeps you focused when riding conditions are at their busiest.
Commuters also benefit from parking monitoring. When wired through the ACC line, the AIO-6 can stay alert even when the ignition is off (with super low power draw), recording if the bike is bumped or tampered with. For riders who leave their motorcycle on the street or in a busy lot during work hours, this becomes an extra set of eyes when you are not around.
Touring Ready
On longer rides, the system shows its depth. The quick release mount means you can pull the unit off at rest stops or hotels, slip it into your bag, and bring it back out the next morning with no fuss. Recording every mile turns your cameras into both an insurance policy and a ride diary.

At every stop, the AIO-6 goes with you—secure, simple, and ready to pick up where your ride left off. Source
The TPMS becomes more valuable the further you travel, catching drops in pressure early when you are hundreds of miles from a shop. You can use offline maps if they’re downloaded on your phone, so even in mountain passes or remote countryside you never lose navigation. Updates and downloads handled over Wi-Fi in the garage before departure mean you start the trip with the system fully current.
Riders using the LTE version also gain access to SOS alerts, which can trigger emergency notifications in case of impact and provide an extra layer of security when touring far from home. The end result is a cleaner, safer touring routine where the AIO-6 quietly supports the ride rather than demanding your attention.

When impact strikes, LTE-enabled SOS alerts notify your contacts—peace of mind for riders far from home.
Adventure Proofing
Off-road and dual-sport riders benefit from the more rugged options. A crossbar mount keeps the display steady and closer to your line of sight when you are standing on the pegs. The TPMS is especially useful here, since dropping pressures for grip is standard practice, and the display lets you monitor exactly where you are so you can air back up before returning to the road. The dashcam records the entire trail, useful if you want to retrace a route or just share the ride later.
With the LTE model, the safety net gets even wider. SOS alerts add peace of mind when riding far from help, while real-time GPS tracking makes it easier for others to follow your progress. For riders pushing into unpredictable conditions, LTE turns the AIO-6 into a connected lifeline that bridges the gap between adventure and safety.
Community & Support
Getting the AIO-6 dialed in on day one sets the tone, but the learning does not stop there. Riders all over the world are experimenting with different mounts, wiring tricks, and software setups, and many of the best solutions come straight from the community. Joining the official Chigee Facebook Group is one of the quickest ways to trade ideas, troubleshoot an odd issue, or see how other riders are using features like BSD sensitivity or TPMS on their own bikes.
For direct help, Chigee maintains an extensive support center with step-by-step guides and installation walk-throughs. They also run an online community forum, where riders and Chigee staff discuss updates, share ideas, and answer questions. If you run into something unusual, you can also open a ticket through their support portal. Between the official docs and the rider community, there is usually someone who has already tested the setup you are considering.
If you want to stay ahead of exclusive offers, giveaways, and special deals, sign up for Chigee's email updates. The AIO-6 is built to grow with you, and the combination of official support and a strong community makes that growth a lot easier.
FAQs
Setting up the AIO-6 raises a lot of practical questions, especially on day one. Here are clear answers to the ones riders ask most often, from power and connectivity to updates and accessories.
Do I need to hardwire the AIO-6 or can I just use USB?
USB power is fine for testing, but it only supplies enough current for the display itself. For actual riding or if you want to test cameras and other accessories, you need to hardwire the unit through the ACC line.
Does the AIO-6 have built-in navigation?
AIO-6 (MAX/LTE) has built-in GPS, but it's not a standalone GPS device. The GPS module works only with the CHIGEE Display to support internal functions like time, speed, and distance. The AIO-6 mirrors your phone's apps through CarPlay or Android Auto. You can use offline maps, but only if they are downloaded in your phone’s navigation app. The display itself does not store maps.

Your phone holds the maps, the AIO-6 brings them to life on the dash. Source
What size microSD card does the AIO-6 support?
The maximum supported size is 256 GB. Chigee recommends high-speed cards (U3, A2, or V30) for stable video recording.
What if my SD card is not recognized?
Make sure it is inserted fully, then try formatting it through the AIO-6 menu. If it still fails, check that the card is 256 GB or smaller and meets the U3, A2, or V30 speed class. Slower cards often cause errors.
Why did my firmware update fail?
The most common causes are weak Wi-Fi or 4G signal and unstable power. Reconnect to a reliable network and make sure the AIO-6 is powered through the ACC line, not USB, before retrying the update.
Why is my BSD giving false alerts?
Check that the rear camera is mounted level and not blocked by luggage or bodywork. If alignment is good, lower the sensitivity or adjust the speed activation threshold in the BSD menu to better match your riding environment.

Tired of false BSD alerts? Recheck your rear camera alignment or tweak sensitivity to fit your riding style.
Does the AIO-6 connect directly to my Bluetooth headset?
No. Pair your headset with your phone, and then connect the phone to the AIO-6 via CarPlay or Android Auto. Audio flows from the phone to the headset, while the AIO-6 provides the visual interface.
What features are LTE-only?
The LTE version adds SOS alerts, remote live video streaming, GPS tracking, and firmware updates over 4G. Standard features like cameras, BSD, CarPlay, Android Auto, and TPMS work on both, AIO-6 LTE and Max.
Can I move the AIO-6 between bikes?
Yes. With a quick release mount installed on each bike, you can snap the AIO-6 off one and onto another. Just make sure both bikes are wired correctly.


2 comments
Laureano Gomez Molina
Tengo una Gs1300, y el aio6 max, mi pregunta es que si desmonto el carplay las cámaras no funcionan verdad?
Anwar Hamid
I have bought A10-6 for my Ducati multistarda V2S 2024 but the assmbly is for vertical mount not for horizontal. Can you please send me the right assembly.
Leave a comment
All comments are moderated before being published.
This site is protected by hCaptcha and the hCaptcha Privacy Policy and Terms of Service apply.