

You install a display to make riding easier, not to add clutter. Mounting, power, weather protection, and cable routing decide whether your CHIGEE feels invisible on the road or fussy at every stop. This guide keeps it practical for real cockpits: naked bars, ADV crossbars, scooters with plastics, and clip-on sport machines. You’ll see where the screen sits without blocking the dash, how to pick a clean power path to a switched ACC source, how to keep water out of ports, and how to run camera leads so the bars sweep freely.
BMW riders get notes on using the Nav Prep cradle and the quick release. If you plan to move one unit between two bikes, we show the fast swap. If you want live tire pressure on the screen, we outline the TPMS options and when each makes sense.
 Match your cockpit: standard bars, ADV crossbar, fork stem, mirror mount, RAM system, or BMW Nav Prep cradle
Start with Mounting Options, move to Power, then Weatherproofing and Cable Routing. The goal is simple: a tidy cockpit that works every ride.
Quick fitment checklist
Before you start, run this 2-minute fitment check so you know what will bolt up on your bike.
Pick the mounting point you actually have
● Standard handlebar, 22–32 mm: the universal handlebar mount is included.
● ADV crossbar, 12–16 mm or 22 mm: use the Crossbar Mount option that matches diameter.
● Sport-bike with clip-ons: use the Fork Stem Mount, compatible with 12–29 mm stems.
● Scooters or faired bars: use the Side Mirror Extension Mount or the CG2 Side-Mirror Pole Mount.
● RAM ecosystem: swap to the 1″ Ball Head Adapter. The default ball is 17 mm.
● Bike-specific bracket: Yamaha TMAX 560 bracket is available.
BMW riders
● AIO-5 Play for BMW and AIO-6 with the BMW Quick-Release work directly in the Nav Prep 5/6 cradle, no extra wiring for power. Some data features depend on model and options.
Cameras and cable reach
● AIO-5 Lite camera cables: front 158 cm, rear 313 cm. Extensions are available if you need more.
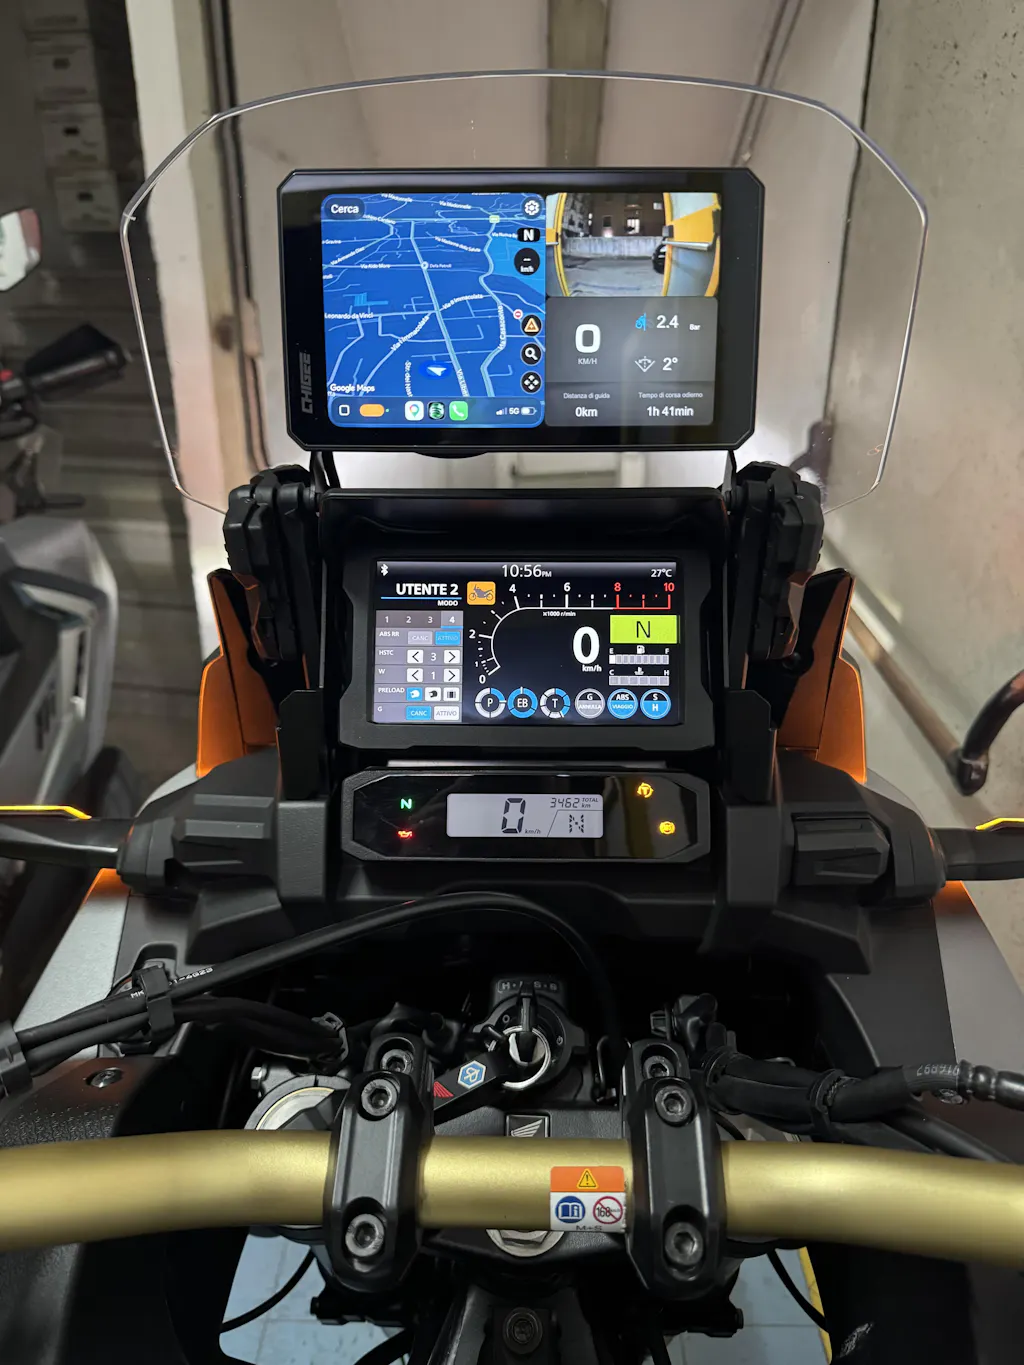
Mounting, by cockpit layout
Pick the layout that matches your cockpit. The notes below cover AIO-6 (LTE or Max) and AIO-5 (Lite or Play).
Handlebar, 22–32 mm
Use the included universal handlebar mount and shims for 22–32 mm tubes. The display-side ball is 17 mm. If you prefer RAM hardware, swap to the 1″ Ball Head Adapter. Position the screen for a clear sightline, then tighten evenly and check throttle, switchgear, and key clearance with a full lock-to-lock sweep.
 Clean mounting across cockpit types: naked bars, ADV crossbar, sport fork stem, and scooter mirror mount. Source
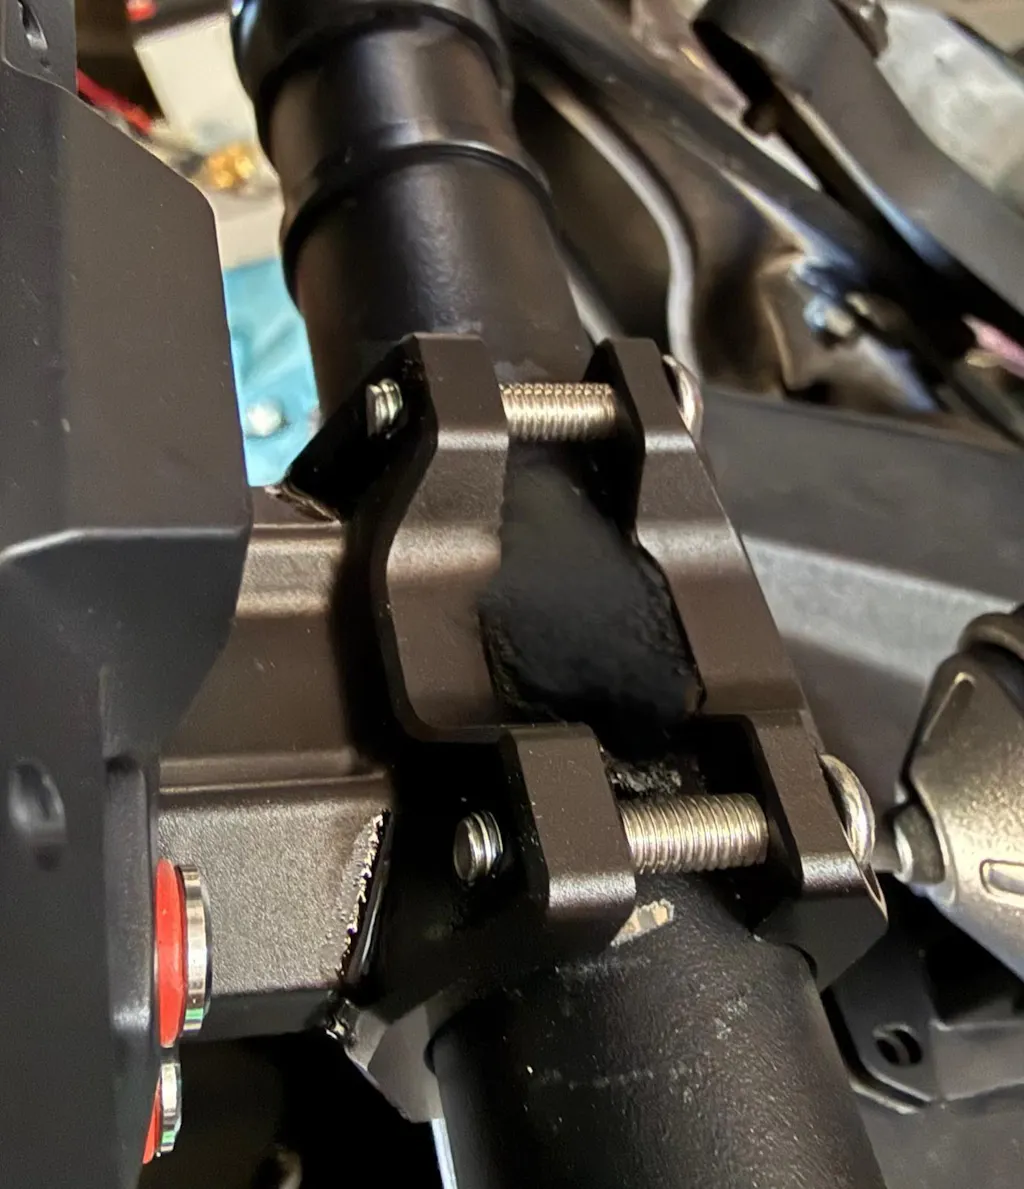
ADV crossbar
Choose the Crossbar Mount that matches your bar: 12–16 mm or 22 mm. Mount centered on the crossbar to keep the display high and easy to read, and to clear tank bags. Drop the cable to the headstock before following the factory loom so it stays tidy and out of the wind.
Sport-bike, limited bar space
Use the Fork Stem Mount, compatible with 12–29 mm stems. This centers the screen above the top yoke and avoids interference with clip-ons. Measure the stem bore, confirm ignition key clearance, set the viewing angle, then final torque after a lock-to-lock check.
![]() Fork-stem mount fits 12–29 mm stems; centers display above yoke, clear of clip-ons. Measure bore, check key clearance, set angle, torque lock-to-lock.
Fork-stem mount fits 12–29 mm stems; centers display above yoke, clear of clip-ons. Measure bore, check key clearance, set angle, torque lock-to-lock.
Scooters or faired bars
Use the Side Mirror Extension Mount for CHIGEE Display. Pick the version for 12–18 mm posts at the mirror area, or the M8/M10 threaded variant if your mirrors bolt in. Anchor at the mirror point where plastics limit bar real estate, keep the screen inside the windscreen sweep, and route the cable under the panels.
 Side Mirror Extension Mount for CHIGEE: choose 12–18 mm post or M8/M10 threaded. Anchor at mirror, keep screen inside windscreen, route cable under panels.
RAM systems
Running RAM arms and bases is simple. Replace the standard 17 mm ball with the 1″ Ball Head Adapter and drop into your existing RAM arm. Use a shorter arm to reduce vibration, snug the joints evenly, and recheck the view at your normal riding posture.
 Swap in the 1″ Ball Head Adapter and drop into your RAM arm. Use a shorter arm to cut vibration, tighten evenly, then confirm the view in riding posture.
Model-specific brackets
For Yamaha TMAX 560, use the dedicated bracket. It bolts to factory points and mates with the back of the CHIGEE Display or the CG Quick-Release base, keeping the cockpit clean and centered.
Quick-release options
BMW Quick-Release Module (AIO-6)
- If your BMW has Nav Prep 5/6, this is the cleanest path. The module docks into the OEM cradle, powers the AIO-6 from the bike, and keeps the cockpit looking factory. It’s designed for quick on/off without extra wiring. Data functions can vary by model; power and basic operation are unaffected.
- Moving between BMWs is simple as long as each bike has Nav Prep 5/6. Undock on one bike, dock on the next. No rewire needed.
 BMW Nav Prep 5/6: dock AIO-6 in the OEM cradle for power and quick on/off—no wiring. Use one backplate; data/Wonder Wheel need CGRC. 3-pin can’t share.
- Avoid swapping the AIO-6 backplate between BMW and CG quick-release systems. Repeatedly changing modules can wear the screw points and mounting holes. Pick one system per unit.
-
If you also plan to add BMW data or Wonder Wheel control, check CGRC CAN/LIN requirements. The BMW 3-pin nav interface cannot be shared by multiple devices at the same time.
CG Quick-Release Module (AIO-6)
- Use this when you want the same AIO-6 to work across different bikes. The kit gives you a locking base and a quick-release cable; attach the base on each bike and you can move the display in seconds. Add a second-bike kit for each additional motorcycle. An anti-theft lock is available.
- If the cameras show “Not connected” after installing the CG Quick-Release, test with the fixed cable included in the box. If the cameras work with the fixed cable, replace the quick-release cable. The QR cable can supply power even when the data line has failed.
CG Quick-Release for AIO-6: mount bases on each bike, swap display in seconds. If cams show “Not connected,” test with fixed cable—replace QR cable.
If you are still unsure which mount suits your bike, start with the mount selector and the step-by-step install video.
Powering it right: switched vs battery, and when USB is ok
Clean power makes the difference between a tidy setup and random gremlins. The goal is simple: wire it once, have it wake with the bike, protect your battery when parked, and keep 4G and cameras stable when you need them.
Hard-wire basics
Your harness has three leads: red to battery positive, black to battery negative, yellow to a switched ACC source. The yellow wire is the on-off signal. When ACC is live the display wakes; when ACC goes to 0 V the display sleeps. This applies to AIO-6 and AIO-5.
Finding a clean ACC source
Use a multimeter at the fuse box. Black probe to battery negative. With the red probe, look for a circuit that shows ~12 V with ignition on and 0 V with ignition off. If your bike lacks an easy fuse tap, the tail-light positive is a common switched line.
Switched vs battery: what each wire does
- Recommended layout: Battery + ACC. Red to battery +, black to battery −, yellow to a switched ACC line. The unit wakes with the key and sleeps when you park. This is the correct wiring for camera stability and for LTE features on AIO-6 LTE.
- ACC-only (no constant battery). Tie red and yellow together to the same switched source, black to ground. The display powers with the key and turns off when you park, but features that must work while the bike is off will not operate. Use this only if you do not need parking-time features.
- Battery-only (no ACC). Not recommended. The unit cannot reliably know when the bike is off and may stay on. Use ACC as a trigger so the device sleeps when parked.
 Correct wiring: red to battery+, black to ground, yellow to switched ACC source for reliable operation
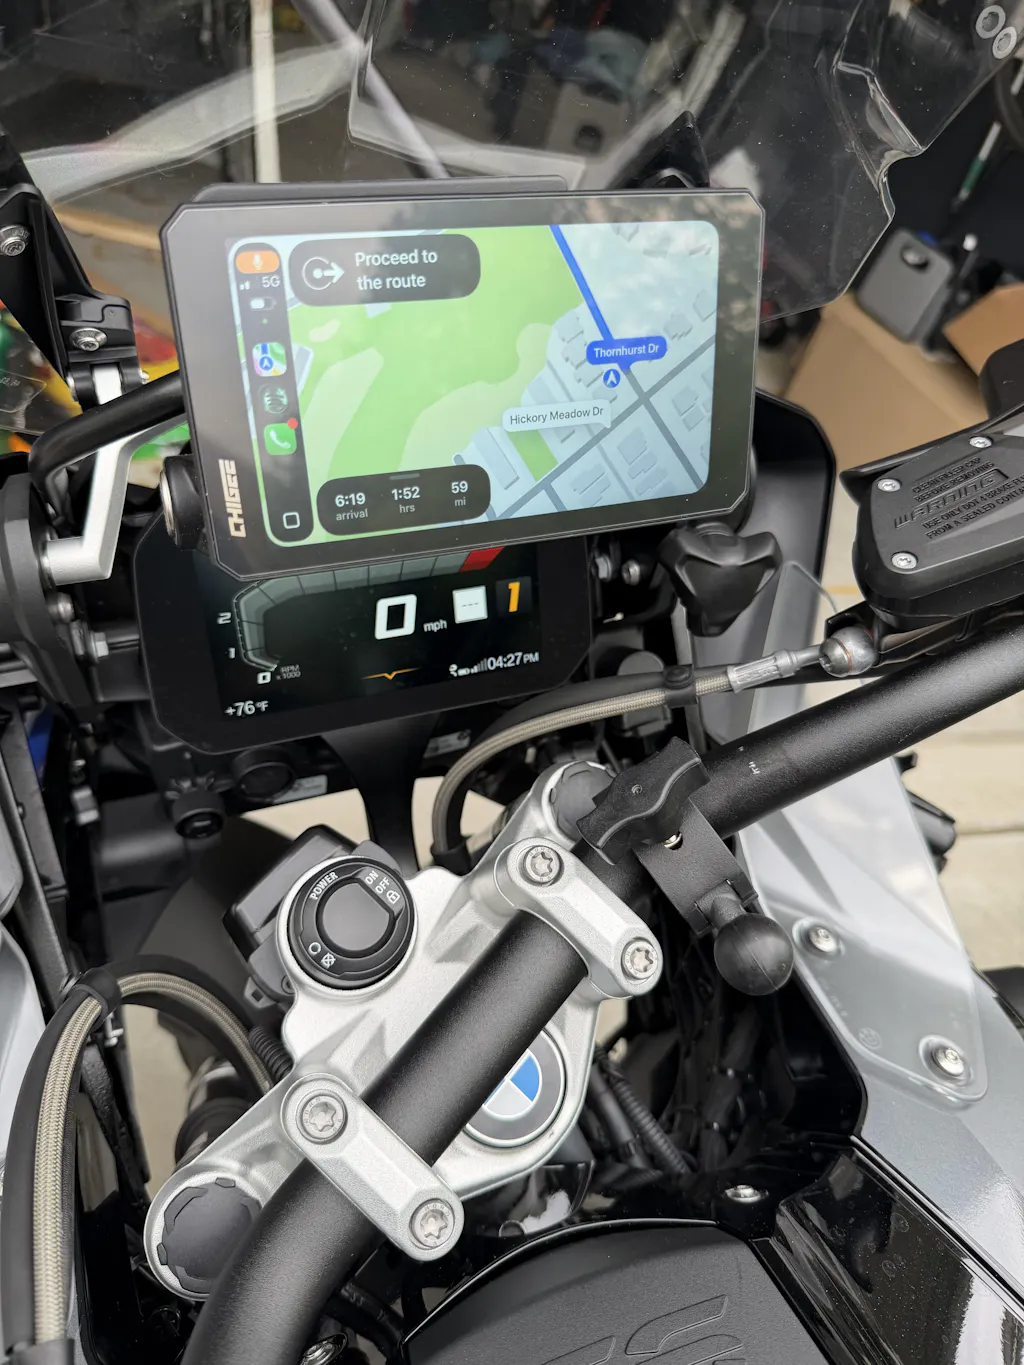
BMW power path
BMWs with Nav Prep 5/6 can power the display from the cradle: AIO-6 with the BMW Quick-Release and AIO-5 Play for BMW both dock and draw power there. For AIO-6 users who want full parking-time features or have cameras installed, add the standard battery + ACC harness in addition to the cradle power.
USB, the right way
USB-C is for bench setup and quick testing before you wire the bike. It is not recommended for riding because opening the port cover exposes the USB bay to water. If you run without cameras, AIO-6 can power up over USB for temporary checks, but cameras and 4G tasks should run on hard-wired battery power for stability.
Quick tip
If something behaves oddly after install, recheck the two fundamentals: red truly on the battery positive, yellow truly on a switched ACC line. Most feature issues trace back to those two connections.
Cable routing fundamentals
A tidy run keeps the bars turning freely, the cameras stable, and water away from connectors. Test power first, then secure the loom so you only tighten once.
 Route cables along factory looms with service loop at headstock - test full lock before securing. Source
Plan before you tie
Mock the layout first. Power the unit, confirm it boots, then turn the bars lock to lock and watch the cables. Leave a small service loop at the headstock so nothing goes tight at full lock. Only zip-tie after everything tests out.
Power harness routing
Run the display lead down to the headstock and follow factory looms along the frame. Keep the fuse close to the battery, avoid sharp edges and hot parts, and use split loom or cloth tape where the cable touches the chassis. Tuck the ACC tap where you can reach it later. Do not crush the harness under the seat latch or tank hinge.
Quick-release leads
● CG Quick-Release (AIO-6): Give the QR cable a bit of slack near the base so the docking motion is smooth. No tight bends within a few centimeters of the connector. Add a small strain relief tie to the mount arm so the weight of the cable is not on the plug. Keep the QR plug accessible for checks.
● BMW Nav Prep 5/6: If you dock into the cradle, route the short cradle pigtail behind the screen cluster and down the center so it does not snag on the bars. Wipe the cradle contacts clean before mounting.
Camera placement and routing (AIO-5 Lite and AIO-6)
Clean the surface, stick the base with 3M adhesive, press firmly, then tighten the fixing screws. Keep cameras out of high-vibration zones. The arrow on the housing points up. If the image is upside down, rotate the lens hardware, do not rely on software to flip. Route camera leads with the factory loom, avoid coil packs and high-heat areas, and add a service loop at the tail so seat removal does not stress the plug.
 Clean, stick 3M base, press, then tighten screws. Avoid vibration; arrow ↑. If inverted, rotate hardware. Route with loom, avoid heat/coils; add tail loop. Source
BSD calibration
BSD uses the rear camera. Mount it 60–90 cm from the ground. Sit on the bike to compress the suspension, enable the calibration line, then tilt the camera until the red guideline lands about 8 m behind the bike. Recheck after your first ride.
GPS module (AIO-5 Lite)
Give the external GPS a clear sky view. Avoid carbon fiber and metal covers. Test satellite lock before you stick it permanently. Route its cable away from power relays where possible to reduce interference.
Seal and finish
Cap any unused camera pigtails or wrap them with waterproof material. Create small drip loops before connectors so water runs past, not into, the plug. Close every port cover fully, then add zip-ties at gentle intervals rather than one tight pull. Nothing should buzz, chafe, or hang loose.
Final checks
Key on, verify the display and both cameras. Turn the bars lock to lock while watching the loom. Sit on the bike and bounce the suspension to confirm nothing tugs. If a camera reads “Not connected” after installing a quick-release on AIO-6, test with the fixed cable from the box. If the fixed cable works, replace the quick-release cable. When everything passes, trim tie tails and refit the panels.
Weatherproofing that holds up
Rain, wash bays, road spray. Your display is built for it, but only if ports and plugs are treated correctly. Here’s what the ratings mean on the bike and how to keep the seals doing their job.
 Keep USB/SD silicone cover fully closed before rain or washing - essential for weatherproof protection. Source
IP ratings by model
● AIO-6 Series: IP69K. Sealed against dust and designed to resist close-range, high-pressure spray. Treat it as weatherproof, not submersible. Keep port covers shut and avoid directing the lance at seams or openings.
● AIO-5 Play: IP68. Dust-tight and protected for heavy rain and splash. Close the cover before you ride and keep it closed during washes.
● AIO-5 Lite: IP67. Dust-tight and protected against temporary water exposure in normal use. Keep the covers seated firmly before you ride or wash.
What IP67 / IP68 / IP69K mean in practice
● IP67: Dust-tight. Survives accidental, brief immersion under controlled test conditions. Not intended for underwater use.
● IP68: Dust-tight. Higher water protection than IP67, tested for longer or deeper immersion as specified by the manufacturer. Still not a license to submerge the device.
● IP69K: Dust-tight and resistant to high-pressure, high-temperature spray at close range. Avoid blasting seals and ports directly.
Cameras and unused connectors
If you are installing cameras later, cap the unused camera leads or wrap them with waterproof material so moisture cannot wick into the harness. Re-check caps and plugs after washes.
Everyday habits that keep water out
Press in the silicone cover over the USB/SD bay before rain or washing. Let the unit dry before opening the cover after a wet ride. Do not aim pressure-washer nozzles close to seams, buttons, or the cradle area.
Wipe the unit after washing, then inspect the USB/SD cover and any quick-release joints. If a cover feels loose or won’t seat flat, fix that before your next wet ride.
When to use Quick-Release, CG2, and TPMS
Pick the tool that fits how you ride and how you swap bikes. This section explains when each option makes sense and what to expect after install.
Quick-Release: which one and when
If your BMW has Nav Prep 5 or 6, use the BMW Quick-Release Module with AIO-6. It docks into the cradle, powers the unit, and keeps the cockpit looking factory. Moving one display between BMWs is simple as long as each bike has Nav Prep. Some bikes do not pass advanced data through the cradle. Power and basic operation are unaffected.
 Accessory options: BMW Quick-Release for Nav Prep, CG Quick-Release for multi-bike, TPMS for tire data
If you ride different brands or you want the same AIO-6 on two motorcycles, choose the CG Quick-Release Module. Install one bike-side base and add a second-bike kit for each extra bike. Dock and undock in seconds without tools. Use the included locking screw to disable the quick function when you park. Add the optional anti-theft lock if you leave the bike on the street.
Pick one system and stick with it. Swapping the display backplate between BMW and CG quick-release repeatedly is not recommended.
Notes for AIO-5 riders. There is no CG quick-release for AIO-5 Lite or standard AIO-5 Play. If you have a BMW with Nav Prep, AIO-5 Play for BMW docks in the cradle for easy on and off. That is a BMW cradle solution, not the CG quick-release system.
CG2 phone holder: when a phone is enough
Choose CG2 if you run phone-only navigation, want a minimal cockpit, or have a scooter or sport-bike with tight space. CG2 grips the phone with one hand, rotates for portrait or landscape, and keeps the battery topped with fast charging. Mount it with the base that matches your bars, fork stem, or mirror post. Use CG2 when you do not need cameras, on-bike recording, or an always-on display.

TPMS: three clean paths to tire pressure on screen
- Use your BMW’s native TPMS if your model outputs pressure through Nav Prep. Set the display to read from NAV in the settings. Some models do not send TPMS over the cradle, so results can vary by year and options.
-
Use CHIGEE sensors when you want guaranteed integration. External sensors screw onto the valve stems and have user-replaceable coin cells.

- Internal sensors mount inside the tire and are sealed. Both report pressure and temperature to the display. If brake caliper clearance is tight, use the valve-stem solution designed to avoid interference.
-
Know what G3 does. G3 TPMS reads on its own screen and does not feed the CHIGEE display. If you want the numbers inside the CHIGEE interface, use internal or external CHIGEE sensors or, on supported BMWs, select NAV as the source.
Bike-specific how-tos and fitment links
The following guides and examples show verified fitments, bracket options, and power setups across popular models, from BMW’s Adventure line to compact sport bikes and scooters.
You can start by checking how to confirm your CHIGEE display fit on your motorcycle to make sure your setup matches your bars or cockpit. For a full walkthrough, the Install CHIGEE Display step-by-step video shows each stage clearly, from mounting to power connection.
For BMW users, cradle compatibility and data notes explain which Navigator cradles supply power and which allow data feed through the Wonder Wheel.
If you ride a BMW R1250 ADV, the crossbar install example shows ideal screen positioning and cable routing. BMW R1300GS Adventure owners can also review the camera positioning notes for cleaner front-end installs.
Sport and smaller bikes are covered too. The Kawasaki Ninja 400 fork-stem install example demonstrates how to fit an AIO neatly without blocking the dash. Riders using a bar system can compare crossbar mount options for 12–16 mm and 22 mm setups to find the right fit.
FAQs
You are likely to hit the same few questions during install and your first rides. Each answer below tells you what to do and why, with simple checks you can make at home.
Can I power the display from USB all the time?
USB-C is for bench setup and quick testing. It is not for daily riding. Opening the port cover exposes the bay to water and dust. AIO-6 can boot from USB without cameras for brief checks, but cameras and any 4G tasks need the hard-wired harness for stability. Wire the bike when you are done testing.
My bike has no spare ACC fuse. Where does the yellow wire go?
Find any clean switched 12 V line. Good candidates are an ACC or IGN fuse, the tail or plate light positive, or a factory accessory plug. Confirm with a multimeter: about 12 V with the key on and 0 V with the key off. Connect red to battery positive, black to battery negative, and yellow to that switched line. Avoid ECU, ABS, or CAN signal wires.
Will it survive rain and pressure washing?
Yes within the rating. AIO-6 is IP69K, AIO-5 Play is IP68, AIO-5 Lite is IP67. All are dust-tight and built for rain. Keep the USB and card door fully closed before riding or washing. Do not blast seams and ports with a pressure nozzle at close range. If the unit gets soaked with the door open, power down, let it dry fully, and inspect the seal before use.
Does the G3 TPMS show on the AIO-6 or AIO-5 screen?
No. G3 TPMS displays on its own screen. If you want pressures on the CHIGEE display, use CHIGEE internal or external TPMS sensors, or on supported BMWs set the TPMS source to NAV so the factory data shows.
Can I move the display between two bikes quickly?
Yes with the right hardware. On AIO-6, the CG Quick-Release lets you undock and dock in seconds. Install a bike-side base on each motorcycle and add the second-bike kit for each one. On BMWs with Nav Prep 5/6, AIO-6 with the BMW Quick-Release and AIO-5 Play for BMW both dock in the cradle. There is no CG quick-release for AIO-5 Lite or standard AIO-5 Play.
Do I need a relay for power?
Most installs do not. The supplied fused harness to the battery provides a stable feed and the yellow ACC wire is only a trigger. If you plan to power several accessories from one switched line, use that line to trigger a relay and pull accessory current from the battery through the relay. This keeps voltage stable and protects factory circuits.
Why is AIO-5 Play rated IP68 while AIO-5 Lite is IP67?
Play is a sealed mirroring unit with fewer openings, so it achieves IP68. Lite adds camera and BSD connections, which introduce more seals and reduce the ingress rating to IP67. Both are built for heavy rain when covers are closed. Neither is meant for submersion.
Can I use RAM hardware with the display?
Yes. The display side ships with a 17 mm ball. Swap to the 1 inch ball head adapter to fit standard RAM B-size arms and bases. Use the shortest arm that works in your cockpit to reduce vibration and recheck clearance at full lock before final torque.


Leave a comment
All comments are moderated before being published.
This site is protected by hCaptcha and the hCaptcha Privacy Policy and Terms of Service apply.